Wardell Station welcomes you

Wardell Station welcomes you
Wardell Station late 1950s

Wednesday 23 December 2020

Christmas 2020


 It has been an extraordinary year 2020, I never thought I would live through a pandemic in which all our plans and busyness of life went out the window. The song by The Byrds "Turn! Turn! Turn! is probably apt for the year of 2020 in which we realise we don't have full control of our future and that there is a time and place for everything. 

Despite the lockdowns and restrictions in social and kids activities, I was able to reflect on life and appreciate life and its blessings. Home, family, work and of course my hobby model railway. I also was able to have time to complete some long overdue projects.

Merry Christmas to all and enjoy this time of year.  Best wishes for 2021 and hope it is a better year that 2020. 


Sunday 29 November 2020

Its SpringTime - Jacaranda Season

Winter has gone and spring has arrived. With the abundant colours of Spring, our neighbour blooms with Jacaranda trees at this time each year. For my layout,  I want to have some jacaranda trees planted so I search around looking for colour foilage, to bring this part of the layout to life.

Above: Finished section with Jacaranda Trees blooming.

Above: Completed Jacaranda trees with completed Terrace houses. 

Above: One of the many large Jacaranda trees blooming in the my nearby suburb taken on 22 November 2020
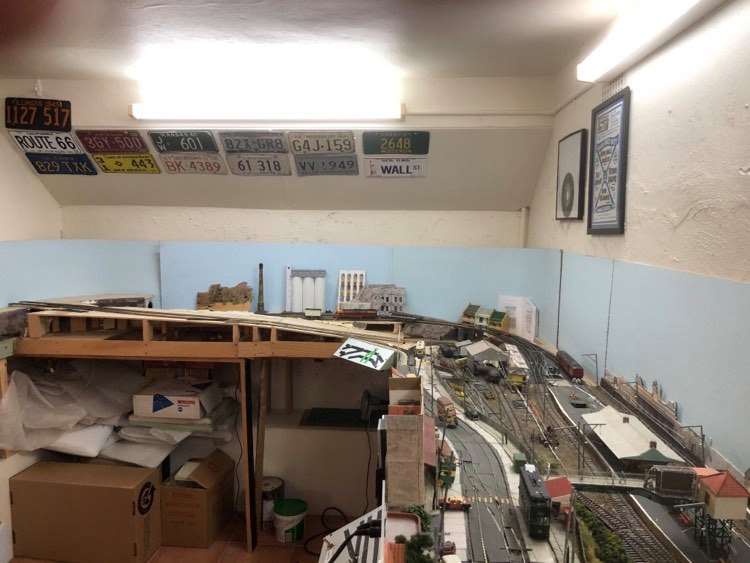
Bring the area to life.
One of challenges and time absorbing aspects of modelling a suburban or rural setting is the effort and time in bring the area to life. Below is the corner area that has been dormant for over year without any scenery. I needed to fill these areas in which would look appropriate but also with the items I had on hand. 
Above: corner area that is to be detailed with scenery.

The Terrace House

As my layout is based in the inner western suburbs of Sydney, it would be appropriate to have at least a row of late 1800s terrace houses. However, by the 1950s, terraced houses were very much working class houses and very run down, unlike today where these houses are now sought after and craftily restored or renovated. The basis of my house is an LJ cardboard Terraced house. These kits are no longer available. However, as these card kits can be quite flimsy if made as is, I replaced the cardboard roof with model corrugated iron and reinforced the walls and floor with balsa wood. I also gave each house a separate distinct character to reflect the standard of living for each occupant. 


Making Jacaranda Trees
I previously made gum trees using old electrical power cord and no more gaps. I use light green foilage for the leaves. Instead of making new trees for Jacarandas, I was able to find purple foilage at the Epping Model Railway Buy and Swap Meet last November (2019).

It was simply a matter of ripping of the green foilage and dipping the branches in white glue and dipping the trees in the zip-lock bag containing the purple foilage.
Voila and the Jacaranda trees are present. 


Friday 2 October 2020

Two Yards does not equal Two metres

I completed my first year yard area back in 20151, being the Wardell Goods yard. This second yard will take place in the 3rd phase of the layout covering the "Newtown" end. I have named it Crago n Dairy Yard as the industries as the sidings for the industries will include milk and flour (as per Crago Flour Mill which is located in Newtown but now currently repurposed as apartments and art studio/offices.

Brief summary of the Control Panel

The control Panel for the second yard consists of 5 points crossing over a bridge and includes a Tram point. All points are medium turnouts and are powered by Peco motors.  As per the previous yard I used red and green 3mm LEDS with green meaning the mainline or straight section and red meaning siding or turning. I also used miniature DPDT monetary toggle switches for each turn out. 

Each point motor has 4 wires two to the switch and 2 wires to the Capacity discharge unit. I also used the PL-13 Accessory switch attached to the motor to determine which direction the point is turning on the LEDS. Wiring description is in my previous post 1

Finally I added a Hex frog juicer so that all points will have continuous power especially on the frog. 

Lessons learnt from my previous yard include the following:
  1. When using the point motors with the long shaft I DID NOT cut them(until all testing is working as it should) so if I needed to make an adjustment in moving the point motor placement it will be easier to locate the hole in the turnout.
  2. Instead of soldering on the wires to the motor or toggle switches, I used Phone In crimpled lugs to crimpled to all the wires. This made it easier to remove the wires when testing and making any adjustments.
Above: Point motor and PL-13 Accessory switch with Phone in Crimpled lugs used. 

Challenges faced
Despite the above the following challenges were faced:
  1. I only a 6mm Drill bit for the layout holes where the point motor shaft connects with the point. I should have drilled it using at least an 8mm or 10 mm to ensure that the shaft has sufficient clearance. 
  2. There was difficulty in trying to use the Peco wood screws to screw the point motor adaptor bases in the underside of the layout. I tried to screw under the layout and it was difficult to ensure that the motor was aligned correctly. I had to tweak a couple of times to ensure that the shaft was free for movement. 
  3. As a result of 2) there two points that I had to ditch the mounting plate adaptor and chisel out a bigger hole and directly attach the point motor to the point. As per below.  

 Finished Product
Attached video shows how the toggle switches work

Overview of Yard


Thursday 6 August 2020

Wrong Side of theTracks

The layout room recently had new LED batten lights installed to replace the old fluorescent tubes. 
In order to do so,  I needed to move part of the layout baseboards that was against the wall and above the lights to be replaced. 

A Different Perspective
As a result, it gave me the opportunity to do some detailing and scenery work to areas of the layout that has been difficult to reach. The width of the layout is 600mm so it can be difficult to get to those hard to reach areas. 
It was also a good opportunity to take some photos of the other Terminus Street side of the layout and give a different perspective of scenes not normally able to be photographed.

Above: View from Terminus Street of Wardell Station looking towards Trafalgar and Crystal St
Above: View from what is now the Cockatoo Hotel, across the footbridge to where the 1950s business once stood. McCallums building has been demolished.


Overall perspective of the room
To give a perspective of how the layout is normally arranged below is the view prior to the lights being removed. 
Below: This shows the Wardell Street Station section is moved to the middle of the room. The backdrop hasn't been removed prior to scenery work and detail work. 


Monday 29 June 2020

Untangling the Mess

More Lockdown activity
It's been almost three months since the Coronavirus has impacted the normal routine of the daily work commute, social activities and kids activities. I have been able to spend more time in the Model room and decided to tidying up the wiring underneath the Wardell Station and Goods yard sidings. 

Untangling the Mess
Every time my friend who is electrical engineering in mind comes to visit and helps me troubleshoot my short circuit or layout wiring problems he complains that my wiring is messy and untidy and connection each should have a colour scheme and he asked for a wiring diagram. 
I said to him, "If I spent all the time on the wiring diagram I would have no time doing the wiring".

Before:
It has been a couple of years since the Wardell station area has run trains. The track needed a good clean I used isopropyl alcohol to clean it using the Noch cleaning pads on one of my wagons.


Previously I did not label any of the points or try to label the wiring hubs which made it difficult to troubleshoot the wiring with the issue with some of the wiring just dangling. The transformer and power pack cords were also arranged poorly with many electrical cords hanging in front of the layout. 


After
Electrical cords for the power pack and transformers were tied together and I hide the power pack within the baseboard framing rather than having it placed separately to avoid the issue of the wiring from the power pack to the Lenz Command Station constantly moving, especially since the power pack is very heavy. 

I also used my trusty Dymo label machine to label the points which match the points on the control panel and also set up LED /light distribution hubs which contained 5 to 6 sets of lights. There are 3 in the Wardell station / street area. 

Below is the wiring tidying up.


Sunday 3 May 2020

Spin-off the 70s

The Blog gets Spun-off
I have been writing this blog since February 2014 and although I have completed over half the layout there is still over a third of the 1950s section of the layout that is to be built with sections complete at different stages. 

On the other hand, I have almost completed all of the 1970s section of the layout, named West Wardell, As a result, I have decided to remove the posts relating to the 1970s and copy them to a separate blog. 

Any future updates relating to the 1970s will be updated in the blog below. 


Post relating to the Inner West and the 1950s section will continue to be posted in the original blog


Thanks for reading and following the blog. Hope you will also visit the new blog too. 

Friday 1 May 2020

Remembering the "Trolleys"

Now for something different
Whilst I enjoy modelling trains, cars, buses and trams you can always get tempted to model something different if it comes your way. This was the case a couple of years ago when I was at the Sydney Model Railway Exhibition at Liverpool in October 2016. At the Peter Boorman Workshop Stand there were a couple resin models of Sydney Trolley buses for sale and I had never seen them before. 
Above: Finished and ready for service - Trolley buses meet at Trafalgar St and Crystal St on the Wardell Layout assuming that Trolley buses could operate alongside trams. 

Above: Photo of both models purchased: Left is the Q Type double decker whilst on the right is the AEC 66T

Historical Context 
Sydney had two trolleybus lines. A line from Town Hall Sydney to Potts Point which ran from 1934 to 1948 and a Kogarah Service Line that replaced the steam tramway that ran from Kogarah railway station to San Souci and Sandringham. This service ran from 1937 to 19591
The period location location of Wardell being in the Inner West of Sydney never operated Trolleybuses so I will use my modelling licence to place them in an appropriate position on my layout. 

The build commences
The resin models were vary basic with no underframe, wheels and the bodies were not hollowed out.
It required a lot more work than anticipated and overall it took a couple of weeks.
The Steps can be seen in the photos below:
Above: Hollowing out windows and doors. 


Above: Building the seat interior of both upper and lower decks by modifying interior passenger car seats so these can fit. 
Above: Building the chassis and choosing wheels using a Kibri truck spare parts kit which I purchased from the bring and buy stalls at one of the Model Railway shows. 
Above: These Corgi British Trolleybuses are the donors for the Trolleywires I hope to offload these minus the trolleywires. 


Above: Prototype painting using the paints I had for my Sydney Tram and bus fleet.
Driver, front chassis and lower interior being tested. 
Finished Product
The Trolleybuses look the part next to the other PTC fleet. I am happy with the result after the models had been left untouched with only part of the models being hollowed out.


1. Jones, D, (2000), Australian Trolley Buses, City Tramway Publications

Sunday 5 April 2020

From Hiatus to Isolation - the work recommences.


The World has changed
Its been over 3 months since I did any work on the layout or any modelling activities. Family overseas holidays, the start of school and family commitments as well as kids activities halted any time spent on doing any modelling. However, the last 2 weeks we have seen a shift in the world we live in and now live under a "New Norm". The Coronavirus pandemic which has spread throughout the world has meant alot of changes in our daily lives. 
  • Working from Home is now the norm
  • The government is encouraging everyone to stay at home except where it is essential:Exercise, work, getting supplies such as food and medical supplies or going to the doctor
  • All events and activities are cancelled -Gatherings of more than 2 people is prohibited. 
  • Zoom "get together" are becoming the norm. 

Time to spend on simpler things
This has given myself a chance to do things around the home such doing a big clean out and doing a stocktake of my kits and models that I have collected over the years. To start with I thought I 'll start with building some model kits. 

The kit chosen
I chose to build the two Trident resin Canadian Pattern Trucks, I had purchased whilst living in Switzerland and are now out of  production are over 10 years old. One kit is a machinery truck and the other is a general purpose vehicle. The kits are made of resin and have brass etched parts. 

Above: Kits before build
Kit Build
The kits are made of resin and have brass etched parts. It took a number of days to complete the build after letting the paint dry between stages. The resin parts especially around the cabin were very fragile whilst trying to remove the flash. I didn't have an Humbrol Olive Drab Number 66 as recommended by the instructions for Army Green instead I had some brown and green generic art paint and mix this up . 

I built the kits as described by the instructions and photo on the box I was going to convert one into a rural fire brigade truck which were used during the 1950s . I then  cut out the fine etch-brass detailed parts and glued them into places after painting them.

Above: Completed models

Prototype and use on layout
The CWT military trucks were called Chevy or Ford Blitz and found many uses after the military did not use them. To accompany the TE Wagon with Centurion tank produced by SDS,  I decided to also include the pair of Chevy Blitzs as a wagon load. My inspiration was the photo.

Above: 
 Moving Military vehicles Ryde 1942 Source: Gallery's record NSW


Above is completed Blitz load  with detailing of rope to secure the loads.
 Conclusion
Depending on how long the government restricts movement I have plenty of model kits and work to do on the layout that will keep me busy if I have to Stay at home and Stay Safe.